If you are new to this column, it is truly meant to be read from the beginning to the most recent.
Please start with the first installment, "What are Designer Toys?"
A reader asked me how a Designer Toy gets made, as in the actual manufacturing process. While this is far from my area of expertise, I'll try my best to give you the broad stroke steps that production is accomplished for resin and vinyl figures, whether self-made or produced in a factory. This is meant to be more of a "This is how it is done" essay and not a "This is how you do it" tutorial… having never done it myself, I feel ill-equipped to write a tutorial on the matter.
Hit the jump to continue reading for the full explanation…
As opposed to my normal Designer Toys 101 columns, this one is going to be rather image heavy, showing you step-by-step how it is done. For this topic, I'm going to use Paul Shih's wonderful pictures of the process he used to make his "Bevil" resin figure. And, like most things, it all starts with a design:
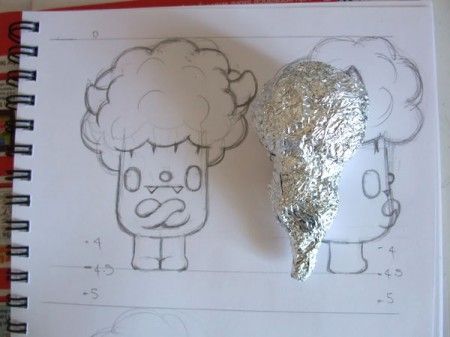
Some people have a vivid image in their head and skip sketching it out, going straight to sculpting, but they still have the design in mind first and foremost. And, for some, this is it for them: they've designed the figure, someone else will sculpt it and actually produce it. Regardless, someone does sculpt it and (in Shih's case) usually does a tight front and back illustration.
As you can see, Shih not only made a finalized design to scale but also sculpted the base figure out of tin foil. This isn't uncommon at all, in order to conserve more expensive materials like actual sculpting clay.
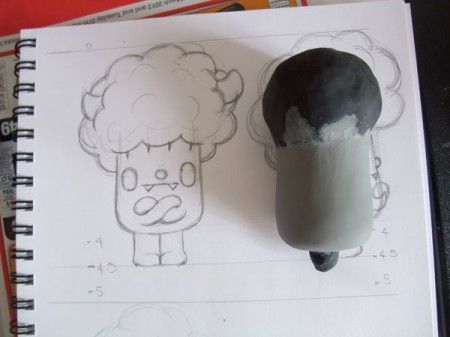
He then starts layering on more and more clay, building up the final form. All the while he is referencing his tight illustration to make sure it is coming together at the proper height and proportions. In this instance, he used 'scrap clay' (material he doesn't like) for the inner base over the tin foil and then covers it with easily malleable material he does prefer so that he can sculpt the details in.
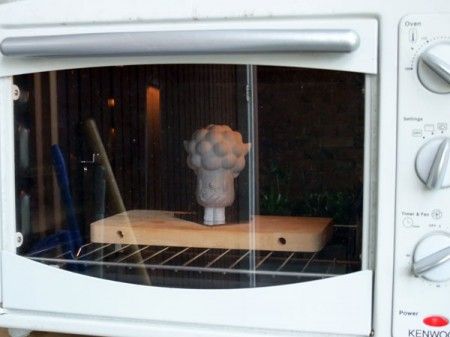
Oh look, like magic the sculpt is done! Okay, so a lot of work went into sculpting it, but I think you get the point. In the end, he has an original sculpt of his figure. Now some clays are air drying and some need heat to set, in Shih's case he needed for his figure to take some time in the oven to firm up.
And once it comes out, Shih will have a finished sculpt of "Bevil." Now if he was going to have it produced in vinyl, he'd more than likely send this off to a manufacturing plant and they'd create a mold from it, cast a wax version of the figure, send it to Shih for approval, and then they'd cast the vinyl figures using a process known as rotocasting. Rotocasting involves taking a small amount of the vinyl and placing it in the mold, then spinning the mold rapidly so that the vinyl is dragged to the outer mold layers by centrifugal force.
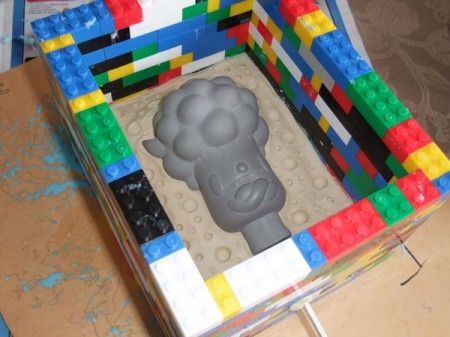
But Shih, on the other hand, will be casting the figures himself in resin, so he builds up a container for the figure to be placed in and the mold to be poured:
At the very bottom of the container is a soft, non-hardening clay that the figure is actually set into. This creates the two halves of the mold perfectly, so that the finished mold can be easily split apart multiple times.
Here's the mold being poured by a jerry-rigged method. From what I understand, a slow mold pour helps ensure it sits more thoroughly and doesn't form bubbles. Once this mold is dry, Shih will pop it out along with the figure and then pour the other half of the mold in a similar manner. But, once that is done…
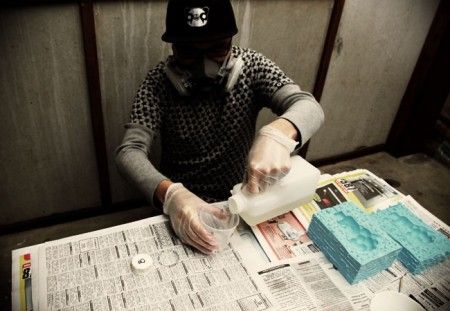
…you have a finished mold (that blue thing next to Shih). He's now mixing the resin, which is readily available in either solid white or clear, though both versions can easily have their color altered by adding pigments to the mixture. Once he has the resin ready, Shih will tie the mold halves together and pour the resin in through a hole he's cut in the mold. At this point, some people use a vacuum chamber or pressure pot to ensure that no bubbles form in the resin, but either way you pull out a completed piece at the end:
And the finished "Bevil" is then hand-painted to give some color variation and definition (a step already done for the piece pictured above). To make more, he just keeps using the same mold and hand-casting each one. My understanding is that a mold will typically last for 20 to 30 figure castings before the form degrades noticeably, but then you just cast a new mold off of your original figure.
So, in the most broad terms, that's how Designer Toys are made. If you're interested in making your own, I strongly encourage you to seek out proper tutorials on-line and not use this as a step-by-step method.
Next Week: Are those action figures Designer Toys?
Designer toys used in this week's colume are:
"Bevil" designed & self-produced by Paul Shih, 2012


No comments
Post a Comment